
Intro
Hey everybody, it’s Joseph. I will show you how to create an active directory home lab. We’re going to use Oracle VirtualBox to run our virtual machines. All you need for this home lab is just a computer running Windows or macOS, at least 8 gigabits of ram, 40 gigabits of storage, and 4 core CPUs. Having better specs and using an SSD will improve the loading when running the lab. Now you need to download Oracle VM with the extension pack, Server 2019 ISO, Windows 10 ISO, and the PowerShell Script. I will link all of these for easy access. You are now ready to start working on the lab once you downloaded everything and set up Oracle, so let’s begin!
Lab Overview
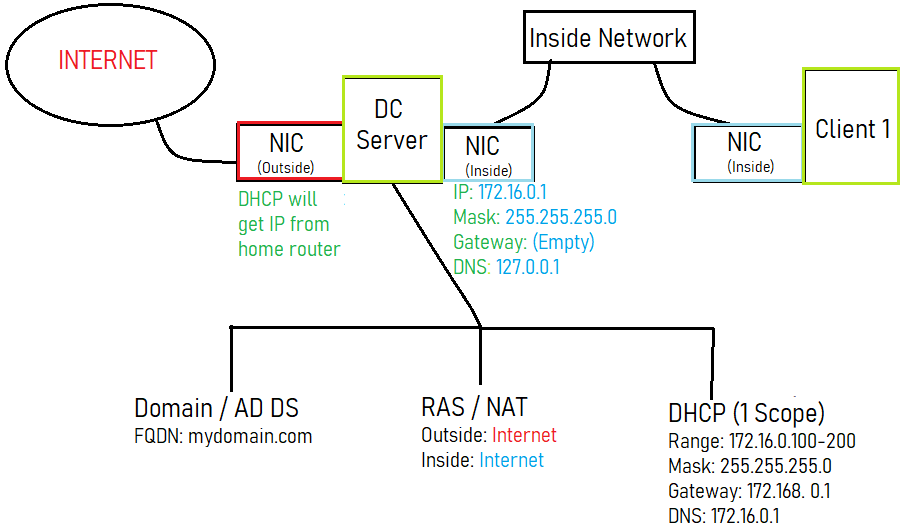
For the overview of this lab, I’m going to display a diagram to make it easier to understand. First, we will create our domain controller server and give it two network adapters. One will connect to the internet and the other one will connect to the private network. After installing Server 2019 on the virtual box, we will be assigning internal IP addresses. After that, we will set up an active directory, then configure NAT and routing, and set up DHCP. To make this lab more realistic we will add +1k users to the active directory. For our Client VM, it will connect to our private network and join it to the domain.
Create Server
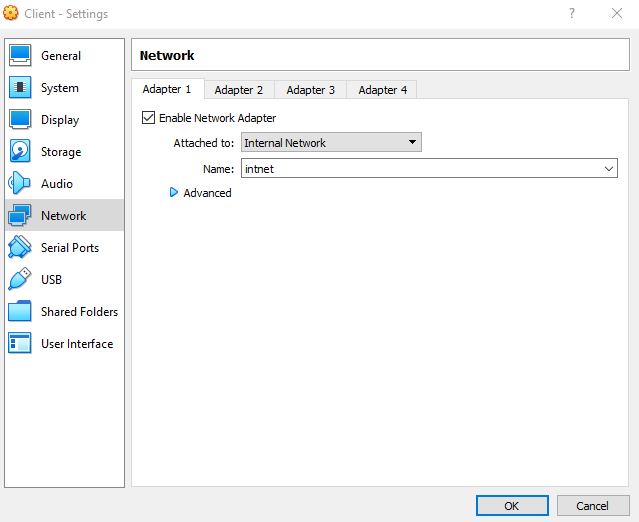
Once you download and install everything, run Oracle VM and you will see a blank Manager like this. (It might look different based on your operating system.) Click on New and name the DC server something simple like DC. Select the drop-down and pick other windows (64-bit), then continue. For the memory size, I would recommend 2 gigabits (2047 MB) but it can do more than add more RAM to reduce loading time. For the rest of the options, just go with the default until you back to the VM manager with one virtual machine. If you are willing to spare CPU cores to speed up this installation, go to settings by right-clicking on the DC server VM. Click on the system then the processor, and increase the number of cores. After that go to Network, select adapter 2, and enable the network adapter. attached the adapter to an internal network from the drop-down. to make transferring files from your home PC to the VM easier, go to General, advance options, and select bidirectional for shared clipboard and drag-drop, click okay.
Install Server 2019
This might take a while depending on how many cores and RAM you gave the VM. Click on the DC VM, when the prompt comes up select the windows 2019 server, then start. Once it gets to the installation screen click next, install now, and select standard evaluation (desktop experience) then click next. Accept the license terms, do customer install, then install windows in drive 0. If you reach the customize setting screen you have done everything right so far. Set the Password as Password1 for simplicity then click finish. When you are in a VM you cant press CTRL+Alt+Delete to unlock the screen, so hover over Input on top of the VM tab, then keyboard –> pick ctrl+ alt+ delete to get in. Type in the password you just entered to get into windows. Now hover over devices then select CD image. Go to file explorer. select This PC, then go into Guest additions to run the amd64 program. pick next on everything until you reboot the VM. log into windows ag
ain.
Setup Server Network
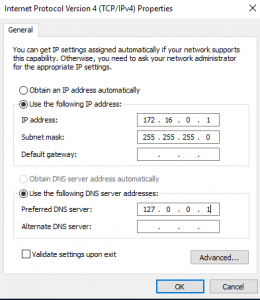
Go to Windows settings, Network & internet, Ethernet, and change adapter options. right click on Ethernet to Status, details, if it has your home IP address Rename Internet and the other to Internal. If Ethernet didn’t have the correct home address check the other one. While you are still on Network connections go to properties, were gonna change IPv4, Using the following IP addresses I will provide below. We will rename this PC by right click on the windows symbol and then the system. Select rename this PC to DC. Then reboot the PC and log into windows.
Installing Active Directory
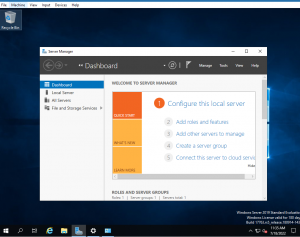
Now we’re going to install the active directory and set it up. On the server, the manager clicks on Add roles and features. Click on next untill you get to server roles. Select Active Directory Domain Services. Keep on clicking on Next untill you reach the Confirmation page, then just install and click on install. Make sure to get familiar with Add Roles and Features Wizard, because we will use it a lot. Once that is finishing loading, you will see an Exclamation mark next to the flag.

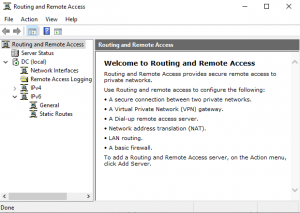
Install and Configure RAS/NAT
Once everything is loaded when you relog into windows go to Server Manager and click on Add Roles and Features. Once you get to Server Roles, click on Remote Access, Next. When you reach Role Service, install Routing, and install. After closing the tab wait at least a minute or the NAT connection will not work. Now click on Tools, and select Routing and Remote Access. Right-click on DC (local) and select Configure and Enable Routing and Remote Access. install NAT when prompted. Select Internet and then finish. You might need to disable the firewall to let Nat work.
Install and Configure DHCP
Were going to DHCP. Go to Add Roles and Features, When you get to Select Server roles, click on DHCP Server then install. Go to Tools and DHCP. Expand dc.mydomain.com and IPv4, then right-click on IPv4 and select New scope. Name the server 172.16.100-200. For the IP address Range copy what I entered below.
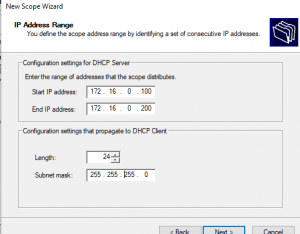
Click Next until you reach Router (Default Gateway). For the Ip address type in 172.16.0.1 and click Add. Once Your unfinished, right-click dc.mydomain.com, authorized it, and refresh it.

PowerShell Script
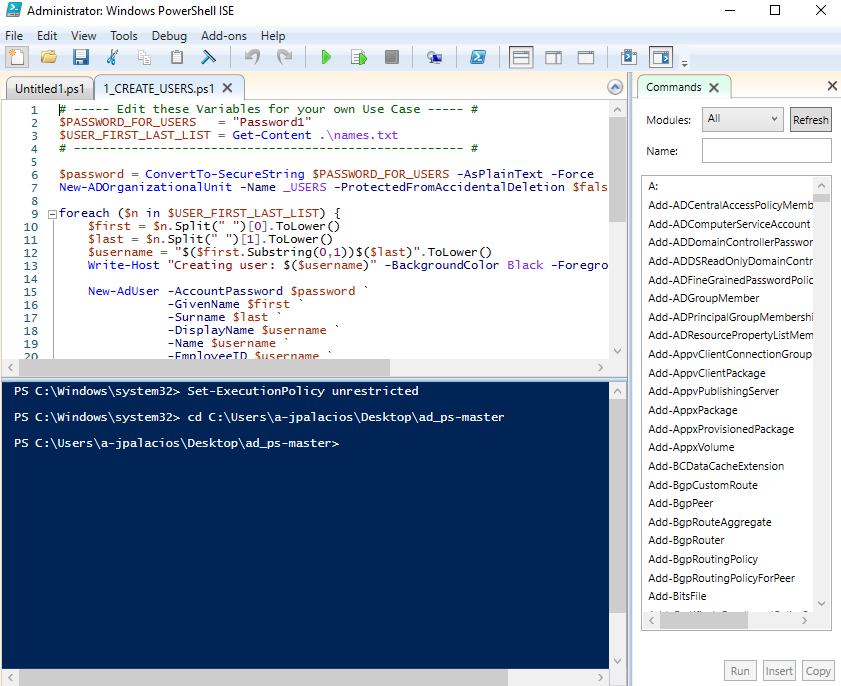
Now You need to move the Powershell script you downloaded earlier into the desktop. Make sure to extract the files. On the name files, you can add your own name to make it more realistic. Now go to the windows logo and click on Powershell then select Powershell ISE. Type in the Powershell these two commands. Set-Executionpolicy unrestricted, and cd C:\Users\(account domain name)\Desktop\ad_ps-master. Load the ps1 file and click play. You might see an error, that’s fine if you do.
Creating Windows 10 VM and Installing Windows 10
Now to create a Client VM. Just repeat what we did in the Create Server section but this time name the VM to Client and when your setting up the network, set Adapter 1 to internal Network.
Joining the Domain
Were going to rename this PC by right click on the windows logo, then going into the system. scroll down until you see rename this PC(Advance) and click on that. Click on change, Name the VM to Client1 and the domain to mydomain.com

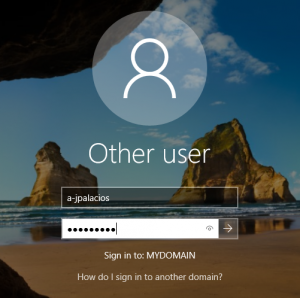
When it is prompted to add an account just add the administrator account you made. Let the Pc to restart. Now login into the Client VM using the account you made.
Outro
This concludes this tutorial. I will make more tutorials in the future about this Active directory we made in the future. If you find this useful or if you had a problem let me know. If you could share this with anyone that could find this useful. Thank you for reading this tutorial.
Hello everyone, I’m Joseph Palacios and this is my blog. Who am I? I am a tech nerd since I was young. I have been using computers ever since I was very young which is very common for people around my age, but I used the computer way too much. I still remember using my old dell desktop. Honestly, it wasn’t that great, it ran Windows XP and my internet in the mid-2000s was terrible. Younger me would always fight the computer just to play flash games.
You must be asking why I created this blog? Because I was bored. Naw, I’m joking. The main reason why is because I wanted to give back and help others. My goal for this blog is to inform others and to share my options. So in the soon future expect a tutorial on setting up a home lab Active Directory and some reviews on tech products. This probably won’t be the only one seeing my website, so expect more.
Thank you for reading my small blog post. I’m still setting up this website so once more expect more. I hope you have a good day.
Leave a Reply